Chapter 15: France saves the day again
Time elapsed: 27y
Seven years after the failed invasion, the fame of Toria and its miraculous technologies has spread to the countries in Europe and beyond.
You have just come back from another meeting with the leaders of a few of these countries who made the trip to see you. While the cultural makeup of Europe is similar to the books of the past, the map looks quite different now. The largest countries are now Monaco, Andorra, Jersey, San Marino, and Liechtenstein, plus Kalmar in the north and Moravia to the east. They are all eager to benefit from your database. Toria is happy to give access, but wants something in exchange: raw goods, people to come work, diplomatic advantages...
One of the leaders asked you an interesting question: would you be able to recreate the internet? You told her no, which was a bit of a lie. The actual answer is maybe.
No, you don't want to recreate it yet. You trust the government of Toria which listens to your opinion and provides free access to information to everyone. But you don't trust the rest of the world to do so. The books of old talk of countries that closed off the internet and warped the truth to fit their needs, and you don't want this to happen again. You need something more...centralised.
The more control you retain, the freer the flow of information. How ironic!
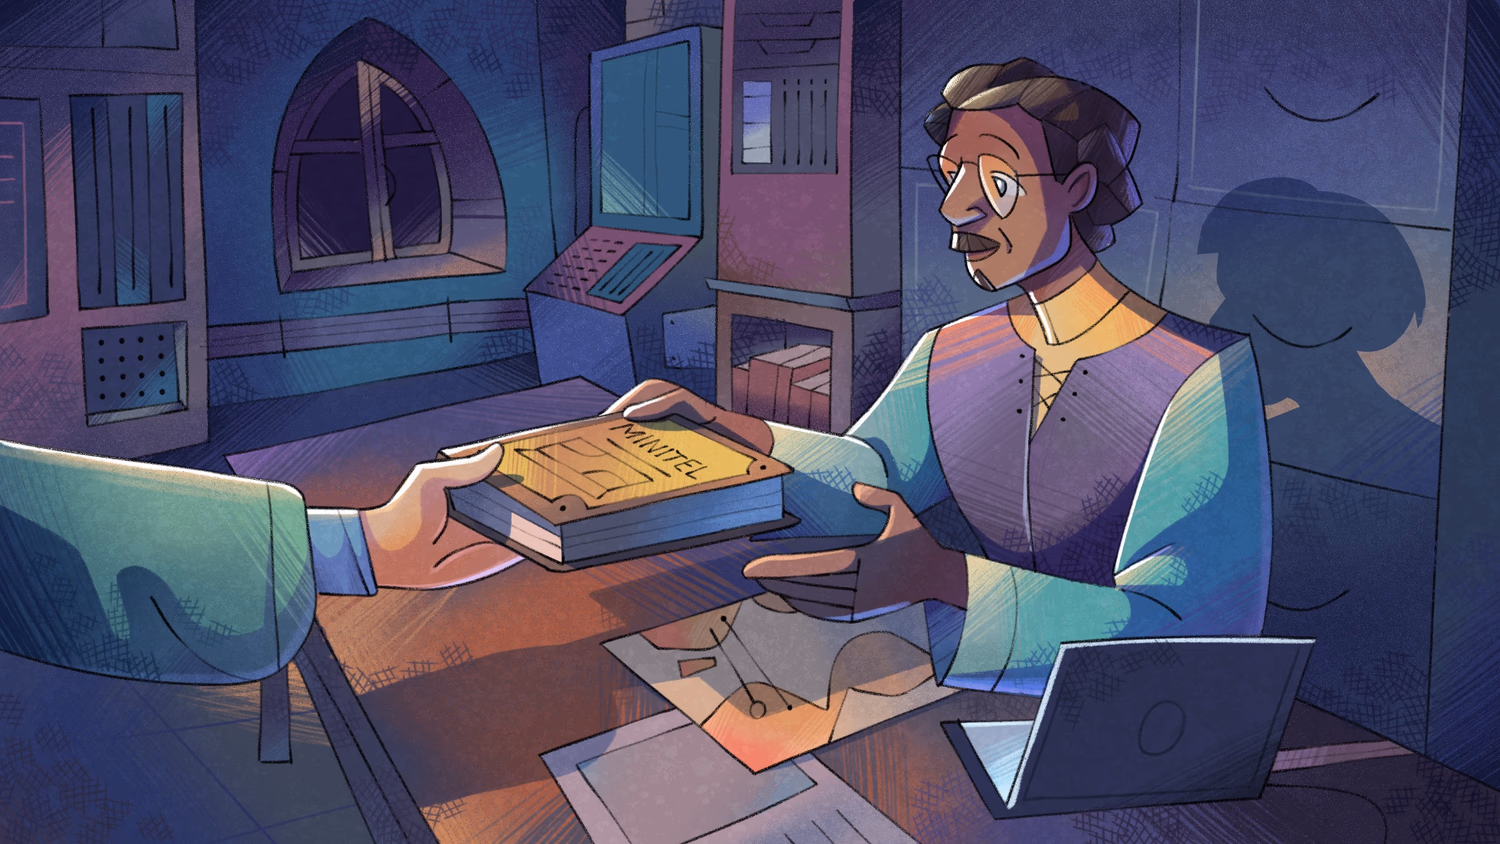
Then one day, you find the answer: another invention from the country known as France! Long before the internet, France had a system called Minitel made up of simple terminals that dialed in to a network for information. If you recreate and install them at points of your choosing, you could give access to information without governments getting in the way.
You call in the team members for a meeting to give them the good news. Time to start sketching out a plan!
Users, permissions, and authentication
As Aeon sketches out a plan for a service to allow people in other countries to query the database remotely, we will follow along by learning about how to set up user authorisation in SurrealDB. This chapter also has a good amount of advice for how you should set up your database to keep it as secure as possible.
There are two types of users in SurrealDB: system users, and record users.
System users are defined on one of three levels (root, namespace, and database) and are used for managing and consuming the database, while record users are used for consuming the database and use custom signup and signin. System users are created with a DEFINE USER statement, while record users are created with a DEFINE ACCESS statement. The root user that we have logged in as throughout the book is an example of a system user.
Authorisation basics
To understand the importance of authorisation, let's first see what SurrealDB does when you connect but aren't an authorised user. By default, SurrealDB denies all actions unless you authenticate. You can give this a try with the surreal start command, followed by connecting through Surrealist or the CLI with a command like surreal sql --namespace ns --database db.
You will be able to connect to SurrealDB at this point, but there is nothing whatsoever that you can do. Even a simple RETURN statement isn't allowed.
ns/db> CREATE person;
Internal error: Anonymous access not allowed: Not enough permissions to perform this action

ns/db> SELECT * FROM person;
Internal error: Anonymous access not allowed: Not enough permissions to perform this action

ns/db> INFO FOR DB;
Internal error: Anonymous access not allowed: Not enough permissions to perform this action

ns/db> RETURN 9;
Internal error: Anonymous access not allowed: Not enough permissions to perform this action
We learned in Chapter 3 that the --unauthenticated flag when starting up is a quick way to get around this, which will allow anyone to do anything they like. But for anything besides simple testing, it's better to define a user.
We've used the INFO statement quite a bit throughout this book, including INFO FOR ROOT. If you use this command after starting SurrealDB with a command like surreal start --user root --password pass, you will see something like the following:
{
    namespaces: {
        ns: 'DEFINE NAMESPACE ns'
    },
    users: {
        root: "DEFINE USER root ON ROOT
               PASSHASH '$argon2id$v=19$m=19456,t=2,p=1$CNnKRpVGsEwZ3wrAJ3/D6w$T3bCbLk7cP2AdBTsJ9qqihzycsivsPP7zcCwdXMf8ac'
               ROLES OWNER
               DURATION FOR TOKEN 1h, FOR SESSION NONE"
    }
}
This user was created at the moment that we started the database, as one of the lines from the startup output shows.
INFO surrealdb_core::kvs::ds: Credentials were provided, and no root users were found.
The root user 'root' will be created
Let's break the DEFINE USER statement above into pieces to make sure that we understand it.
The statement starts with
DEFINE USER root ON ROOT. The other options you can choose areDEFINE USER username ON NAMESPACEandDEFINE USER username ON DATABASE.Note that you don't specify the namespace or database name inside a
DEFINE USERstatement. So you can't typeDEFINE USER username ON NAMESPACE ns, justDEFINE USER username ON NAMESPACE. To ensure that the user is defined in the right space, you have to first switch to the namespace or database in question with aUSEstatement, likeUSE DATABASE dborUSE NAMESPACE ns.The
PASSHASHpart is a pretty interesting discussion that we will get to in the next section.DURATION FOR TOKEN 1h, FOR SESSION NONE: You can specify a duration for a user's token as well as a user's session, and since we didn't, SurrealDB used these default values. TheNONEin this case means that there is no expiration. These default values are intended for cases where SurrealDB is used as a traditional backend database, which is why sessions do not expire by default.ROLES OWNER: SurrealDB currently uses three built-in roles for users (this is known as Role-Based Access Control). What each role is allowed to do is best summarised in the chart below:
| OWNER | EDITOR | VIEWER | |
|---|---|---|---|
| Resources | View, edit on user's level or below | View, edit on user's level or below | View on user's level or below |
| Including user and token (IAM) resources? | Yes | No | No |
| Child resources (tables, fields, etc.) supporting PERMISSIONS clause | Full permissions | Full permissions | View permissions |
We will get into recommendations on how best to set a duration and other security details a bit later in the chapter. But first, what exactly does this PASSHASH value represent? We entered pass as the password for our root user, but this is clearly a different value. The story behind this is a long one, but is easy enough to follow if we take it one step at a time. So let's learn a bit about how passwords are verified.
A bit of cryptography
This book doesn't get into all of the details of cryptography, but it is worth knowing how it works when it comes to databases.
We used the surreal start --user root --password pass command above to create a root user when we started the database in this chapter. Alternatively, you can create the same user inside Surrealist by clicking on Authentication and adding a new root user.
The output for INFO FOR ROOT then contains a passhash that looks like this. What exactly does this mean, and how is it used to authenticate a user?
/**
[test]

[[test.results]]
value = "NONE"

*/

DEFINE USER root ON ROOT
PASSHASH '$argon2id$v=19$m=19456,t=2,p=1$UNoyQE190f16on8zAAEpMg$KTS1Us9l8dW8eP1NyH64RPTRi+UUNcViYA8aeqmXrhE'
Since the 1970s, passwords that users enter have been "hashed" into forms that make them both unrecognisable and irreversible. In fact, the name hash comes from the food, because this food - made out of chopped up potatoes and beef - is also irreversible. You can't turn hash back into the original ingredients that were used to make it.
Once hashing was invented, it became possible to store hashed values on databases instead of storing actual passwords.
SurrealDB has a number of functions inside its crypto module that let us experiment with hashing behaviour. One of them is called sha256. Let's take a look at the output this function gives.
'd74ff0ee8da3b9806b18c877dbf29bbde50b5bd8e4dad7a3a725000feb82e8f1'With this, any user that enters the password "pass" will have it hashed through this function, the output d74ff0ee8da3b9806b18c877dbf29bbde50b5bd8e4dad7a3a725000feb82e8f1 will match what the database has in store, and the user will be able to log in.
That by itself is pretty safe. But a password that is only hashed isn't enough for password security, because hashing a certain input will always result in the same output.
[
  'd74ff0ee8da3b9806b18c877dbf29bbde50b5bd8e4dad7a3a725000feb82e8f1',
  'd74ff0ee8da3b9806b18c877dbf29bbde50b5bd8e4dad7a3a725000feb82e8f1'
]
This means that someone could make a big table of passwords and their hashed values in order to find a password from a hash. And in fact attackers use this method so much that they even have their own name: rainbow tables. They look like this.
| Password | Hash |
|---|---|
| pass | d74ff0ee8da3b9806b18c877dbf29bbde50b5bd8e4dad7a3a725000feb82e8f1 |
| password | 5e884898da28047151d0e56f8dc6292773603d0d6aabbdd62a11ef721d1542d8 |
| passw0rd | 8f0e2f76e22b43e2855189877e7dc1e1e7d98c226c95db247cd1d547928334a9 |
This wouldn't be a problem if we all used passwords of incredible length. A rainbow table would be pretty useless if every human on earth used unique passwords like these on each and every website they used.
| Password | Hash |
|---|---|
| No_Need_To_Salt_If_Your_Password_Was_This_Long!w | a78b6a1148a8c75e17ca56274e802bc042cb79ca442c2a164c2b9f49249c9f06 |
| And_Always_Unique_For_Every_Website_You_UseG2DKp | a5666fb2a679f0478d812281cd3d6efb82ef29e92b9fa4d0610c4b1e9f62c220 |
| And_You_Could_Remember_Each_And_Every_OneExeyNBw | 056ddc2ae0ca8ac369f703c635d06440dd89ad7ff2faee785c242f2f6bad8c28 |
Unfortunately, people can only remember passwords of a certain length, frequently use weak passwords like 123456, and use the same password over multiple sites. If passwords were only hashed, then attackers would be able to quickly find the original passwords for most users on a site every time a database's content is leaked!
A method called "salting" was invented not long after hashing to fix this problem. A "salt" is a random string that is appended before a password is put into a hashing function, resulting in a different output even if the same password is passed in.
SurrealDB's crypto module contains functions that both hash and salt. Let's give one of them a try. We'll go with bcrypt, which produces fairly short output.
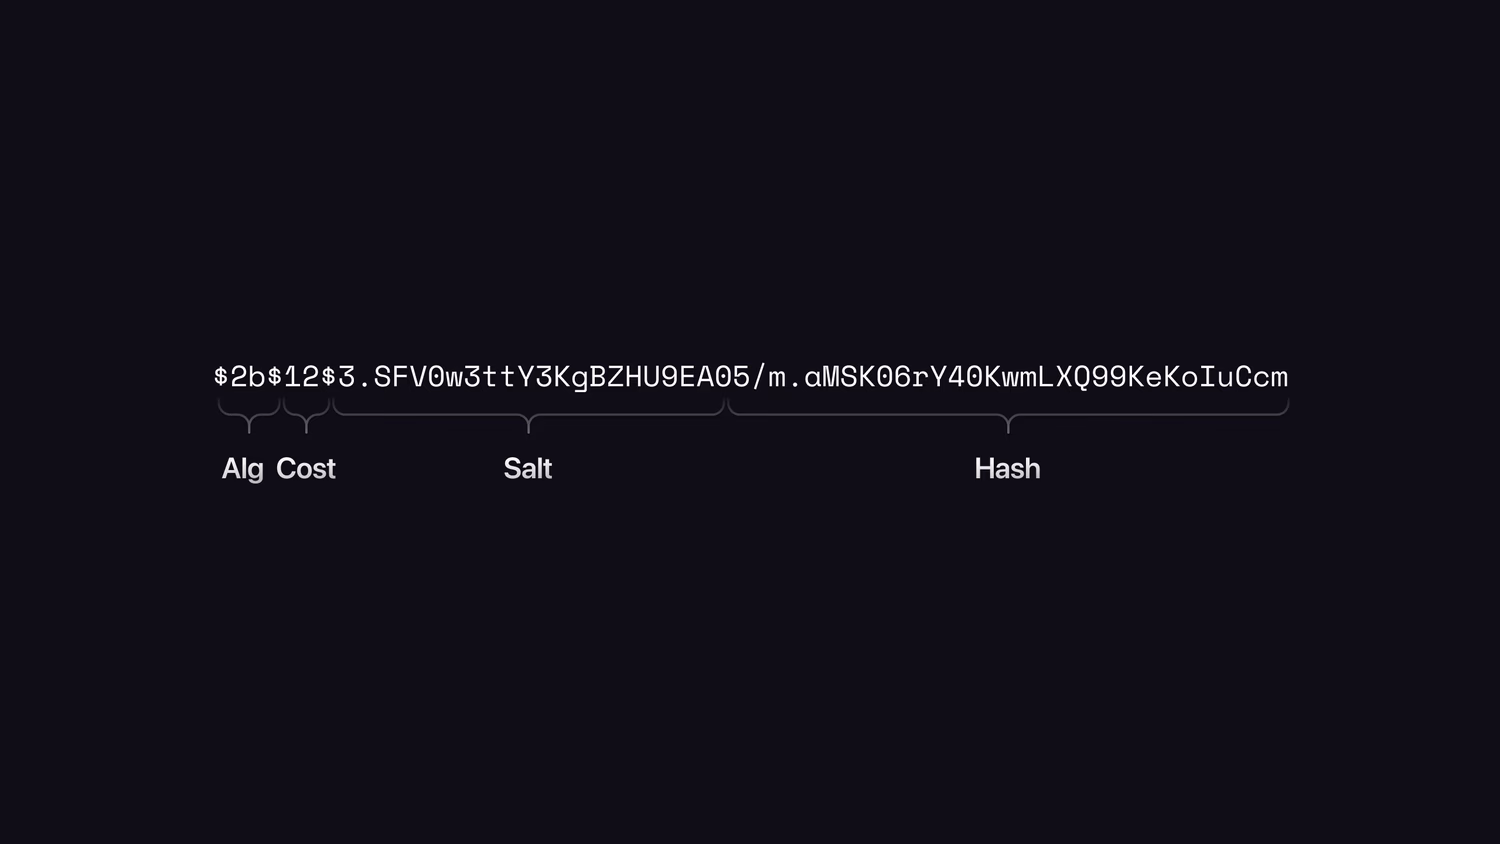
[
  '$2b$12$3.SFV0w3ttY3KgBZHU9EAO5/m.aMSKO6rY40KwmLXQ99KeKoIuCcm',
  '$2b$12$0BqTikqfNqSELSkpYZxLyecIEFPLVCfl2Gr/BNsOnOBgDwW05XPju'
]
And that is what gets stored in the database. As a result, the rainbow table method above is now useless!
Mind you, it is true that a hashed and salted password does show where the salt was used. The bcrypt algorithm for example will always result in a predictable format that shows the algorithm used, the cost, the salt, and finally the hashed value.
In the first output of the two functions above, the algorithm is $2b, the cost is $12, the salt is 3.SFV0w3ttY3KgBZHU9EAO, and the hashed value is 5/m.aMSKO6rY40KwmLXQ99KeKoIuCcm.
However, this is still useless for an attacker who wants to use a rainbow table. This attacker would need a whole table for each possible random salt, and only then would have the complete list of possibilities for one password.
| Password | Salt | Hash |
|---|---|---|
| pass | 3.SFV0w3ttY3KgBZHU9EAO | 5/m.aMSKO6rY40KwmLXQ99KeKoIuCcm |
| pass | 0BqTikqfNqSELSkpYZxLye | cIEFPLVCfl2Gr/BNsOnOBgDwW05XPju |
| pass | CRVVBHnUcuGGsjApfZ7dNe | tZZ4Kmyrj4uI7zURGZZWc4IypYYleOi |
And on top of that, other cryptographic functions like argon2 generate even longer output than this.
Okay, but how do you know if a password is a match? You can't turn the hashed value back into "pass", but you can use a compare function to see if the hashed value and the password match.
The output shows that the generated hashes are different, but you can still use them to compare with an entered password. If the output is true then the password matches, and if false, then it doesn't match.
-------- Query --------

[
  '$2b$12$q0VqaTfOQRE/T8NscF2CxuA3rVrG5NEnMmvATueRGbW0N.NqJy0nW',
  '$2b$12$1ITjuN..QW3DDqe1dbJKe.asKOPjV48KrlobfrKyLXcjn6qgg0IHi'
]

-------- Query --------

true

-------- Query --------

true

-------- Query --------

false

-------- Query --------

false
With a hashed and salted password, a potential attacker's only choice is to try random passwords with a compare function to see if there is a match.
And that's why you still need to use a strong password even if passwords are hashed and salted. If your password is just 1234, an attacker that stole the hashed and salted value of one of your logins could use a compare function to get a match quite quickly.
But even then there is a lot of extra security built in. The algorithms for bcrypt, scrypt and argon2 are specifically made to take a long time for a machine to compute, but not long enough for you to notice when logging in: generally tens or a few hundreds of milliseconds. That means that an attacker's machine can only compare a few passwords per second out of billions of possibilities! To an attacker, this is like driving on a road made up entirely of speed bumps. You might have noticed a delay of about a second or more in the last few queries, which used a number of these functions one after the other.
We can give this a quick try by checking the time::now() before and after the bcrypt functions used above.
The final output will be something like 1s8ms, pretty long for four function calls!
In contrast to algorithms made specifically for password security, hashing-only algorithms are made to be as fast as possible.
So be sure not to use hash functions like crypto::md5, crypto::sha1, and crypto::sha512 for passwords - even if you are providing your own salt. Instead, use the functions inside crypto::argon2, crypto::bcrypt, crypto::pbkdf2, or crypto::scrypt.
With the basics of cryptography under our belt, let's get to the second type of user that you can create in SurrealDB.
Record users
The second type of user in SurrealDB is a record user. The name 'record user' is used because a record user is saved as a record in the database.
A record user differs from a system user in the following way:
A record user is defined on the database using a
DEFINE ACCESSstatement instead of aDEFINE USERstatement.A record user is used for consuming the database. This is built into the syntax, which begins with
DEFINE ACCESS access_name ON DATABASE TYPE RECORD.A record user can use custom signup and signin.
The
$authparameter links to the record holding the information for the currently logged in record user.
So the first thing to do when setting up record users in your database is to think about what fields their records should have, and how to verify them. SurrealDB's documentation has a simple example of a user table that is easy enough to follow. It starts out with a table definition, as well as PERMISSIONS clause.
/**
[test]

[[test.results]]
value = "NONE"

*/

DEFINE TABLE user SCHEMAFULL
  PERMISSIONS
    FOR select, update, delete WHERE id = $auth.id;
Instead of a ROLE, here we can see certain permissions being allowed as long as the id inside the $auth parameter equals that of the user record. Record users have no permissions by default, so they don't use the Role-Based Access Control system that we saw in the chart above for system users. The above definition will allow a record user to view, update and delete its own data - but nothing else.
After that come a few fields to ensure that they are of the right data type, an assertion so that the email entered is an actual email, and an index to ensure that only one user can use any single email.
/**
[test]

[[test.results]]
value = "NONE"

[[test.results]]
value = "NONE"

[[test.results]]
value = "NONE"

[[test.results]]
value = "NONE"

*/

DEFINE FIELD name     ON user TYPE string;
DEFINE FIELD email    ON user TYPE string ASSERT $value.is_email();
DEFINE FIELD pass     ON user TYPE string;

DEFINE INDEX email ON user FIELDS email UNIQUE;
So that is what a user record will look like once it is created. To allow people to sign up and sign in on their own to create users, we will use the DEFINE ACCESS statement, which has the following syntax:
DEFINE ACCESS [ OVERWRITE | IF NOT EXISTS ] @name
  ON DATABASE TYPE RECORD
    [ SIGNUP @expression ]
    [ SIGNIN @expression ]
    [ WITH JWT
      [ ALGORITHM @algorithm KEY @key | URL @url ]
      [ WITH ISSUER KEY @key ]
    ]
    [ WITH REFRESH ]
  [ AUTHENTICATE @expression ]
  [ DURATION
    [ FOR TOKEN @duration ]
    [ FOR SESSION @duration ]
  ]
SurrealDB's documentation has a nice and simple example that shows the absolute minimum to allow a record user to be created. Both SIGNUP and SIGNIN hold an expression: one to create the user when it is signed up, and the next to select the right user by first filtering against its email and then a compare() function to ensure that the password is correct.
/**
[test]

[[test.results]]
value = "NONE"

*/

DEFINE ACCESS account ON DATABASE TYPE RECORD
  SIGNUP ( CREATE user SET email = $email, pass = crypto::argon2::generate($pass) )
  SIGNIN ( SELECT * FROM user WHERE email = $email AND crypto::argon2::compare(pass, $pass) )
  DURATION FOR TOKEN 15m, FOR SESSION 12h
;
There are other ways to implement signing in as a record user, such as the AUTHENTICATE clause which lets you authenticate once, resulting in better query performance because permissions will not need to be validated on each query. This page in the documentation is a good place to help make a decision on what sort of behaviour to choose.
Actually signing up and in for a record user is a little bit out of the scope of this book, as you will need to have a front end set up to manage this. You can see two examples of signing in through the Javascript SDK or through an HTTP request, while the Rust SDK also has a struct for record users which can be passed in to the .signup() and .signin() methods.
Now that you know how to define both types of SurrealDB users, let's look at some tips on how to make your database as secure as possible.
Security best practices
Capabilities and authentication settings
We learned in Chapter 13 that SurrealDB disallows a lot of functionality by default, which is why we could only use its HTTP functions after passing in an --allow-net flag when starting up. There are quite a few other flags that are similar in nature, such as --allow-scripting and --allow-funcs, plus others that do the opposite: --deny-scripting, --deny-net, and so on. The most permissive of all is --allow-all. Along with the --unauthenticated flag, that means that surreal start --unauthenticated --allow-all is the absolute least secure way to start your database! However, it's a great option for testing locally.
Beyond this extreme, you are going to want to make a decision on what functionality should be allowed, and what not. How do you make the right choice? Here are a few rules of thumb to get you started.
Allow capabilities on a case by case basis, instead of generally. For example, while you can enable all functions with the
--allow-funcsflag, you can also enable certain functions such as with--allow-funcs http::get(for a single function), or--allow-funcs parse::email::*(for all the functions inside theparse::emailpath). You can also add--allow-netto restrict network requests to a specific address, such as--allow-funcs "http::get" --allow-net "api.example.com:443".As mentioned in the section on cryptography in this chapter, store passwords using one of SurrealDB's hashing functions (
crypto::argon2::*,crypto::bcrypt::*,crypto::pbkdf2::*, orcrypto::scrypt::*).Add a
PERMISSIONSclause for extra security like in theDEFINE TABLE userexample above.Reduce the
TOKENduration from the default1hto the shortest possible duration that will work for you, because tokens are often stored in the client (like a web browser) which is less secure. A token should ideally only last as long as the time needed to start a session, which is more secure as they exist only in the context of an established WebSocket connection.Use the provided methods in SDKs to make queries (like the .bind() method in the Rust SDK) if your application needs to use untrusted input. Doing this will avoid SQL injection vulnerabilities.
If you are still hungry for more security best practices, take a look at SurrealDB's reference guide on the subject. That page goes into much greater detail than is possible inside a single section of this book, including subjects such as encoding HTML, JSON web tokens, security when using one of SurrealDB's SDKs, and network exposure.
This chapter has been a flood of information, so let's end it off with a bit of fun by imagining how Aeon and the team might implement record users in their world which is still a mix of medieval and modern technology.
Aeon's record users
As we've seen in the past two chapters, Aeon would like to provide free information to the world but without making a decentralized network to provide it. Instead, teams from Toria will install Minitel terminals at various points that anyone can sit down at to use without logging in. This makes sense as Europe and the rest of the world didn't even know what a computer was until recently, and nobody can expect their common citizens to know how to create users and passwords. Their user experience will probably just involve typing out a word or two, hitting enter, and then writing down the information they see on the screen.
So how can this be done? Well, as the documentation mentions, record authentication is quite flexible and allows you to define your own logic:
We will go over one of the many ways you can set up record authentication. Given you can define your own logic, there is not a single way to do it. Feel free to modify where needed!
That's perfect! So instead of having each person be a record user, why not have each terminal be a record user?
Aeon's use case looks roughly like the following.
Teams of people from Toria are in Europe to administer the Minitel terminals.
The
terminalrecords will hold various bits of information about the terminal, such as its location, metadata, and whether local authorities are cooperating or not.Implementing automatic signup is too difficult for them at the moment, so the
DEFINE ACCESSstatements will only contain information onSIGNIN. TheSIGNUPlogic we have seen creates a record, but there is no reason that a record can't be created manually ahead of time. Every time a telegram comes in from Europe requesting a new record, the people back in Toria will create aterminalrecord, add some metadata, choose a password, and send a telegram back to the employee in Europe.The person in Europe will receive the telegram with the terminal ID and password, probably something secretive and fun like "BlueBirdFliesAtMidnight".
The session expiry will be set to
30dso that employees can log in once and leave the terminal open for the whole month if they prefer.
This will lead to a fairly small schema: a terminal table that requires a password, has two optional fields to describe the terminal's location, and a metadata field for any and all other information. The metadata is a flexible object because the information added will depend entirely on what the employee in the field tells them, and could be almost anything.
/**
[test]

[[test.results]]
value = "NONE"

[[test.results]]
value = "NONE"

[[test.results]]
value = "NONE"

[[test.results]]
value = "NONE"

[[test.results]]
value = "NONE"

*/

DEFINE TABLE terminal SCHEMAFULL;
DEFINE FIELD metadata ON TABLE terminal TYPE object FLEXIBLE;
DEFINE FIELD pass ON TABLE terminal TYPE string;
DEFINE FIELD location ON TABLE terminal TYPE option<point>;
DEFINE FIELD location_notes ON TABLE terminal TYPE option<string>;
The signin logic is pretty simple: just a check that the password for the terminal number is correct.
/**
[test]

[[test.results]]
value = "NONE"

*/

DEFINE ACCESS account ON DATABASE TYPE RECORD
    SIGNIN (
        SELECT * FROM terminal
            WHERE id = $id AND
            crypto::argon2::compare(pass, $pass)
    )
    DURATION FOR SESSION 30d;
Once a telegram arrives from Europe, Aeon and the team will create a terminal that looks something like the following.
CREATE terminal:1 SET
    metadata = {
        terminal_name: "Central Rome, San Marino",
        employee_notes: "San Marino was known in the 21st century as Italy, though the city name Rome remains the same. Locals have been cooperative so far.",
    },
    location_notes = "On the corner of Piazza San Marino",
    location = (41.8924, 12.9271),
    password = crypto::argon2::generate("BlueBirdFliesAtMidnight");
They will then send back a telegram telling the employee that the terminal has an ID of 1, and a password of "BlueBirdFliesAtMidnight".
With that logic set up, let's simulate the knowledge database that people will be able to query by creating some very small encyclopedia_article records. After starting the database with the --allow-net flag, the following query will create some articles with a short summary from Wikpedia on subjects that people in Aeon's time might be interested in knowing about. Wikipedia has a free API at https://en.wikipedia.org/api/rest_v1/page/summary/ that makes this pretty easy to do:
FOR $name IN ["Venus", "Plato", "Pasteurization", "Mathematics", "Electricity", "Nitrogen"] {
    LET $url = "https://en.wikipedia.org/api/rest_v1/page/summary/" + $name;
    LET $content = http::get($url);
    CREATE encyclopedia_article SET content = $content.extract;
};
Each article will be about the size of the one below for Venus, which unfortunately doesn't mention how Earthlike the conditions are in the upper atmosphere of Venus (but that is a tale for another time):
"Venus is the second planet from the Sun. It is a terrestrial planet and is the closest in mass and size to its orbital neighbour Earth. Venus is notable for having the densest atmosphere of the terrestrial planets, composed mostly of carbon dioxide with a thick, global sulfuric acid cloud cover. At the surface it has a mean temperature of 737 K and a pressure of 92 times that of Earth's at sea level. These extreme conditions compress carbon dioxide into a supercritical state close to Venus's surface."
We should also be sure to define some permissions on the encyclopedia_article table which states that a terminal when logged in is able to SELECT them, but no more.
/**
[test]

[[test.results]]
value = "NONE"

*/

DEFINE TABLE OVERWRITE encyclopedia_article
  PERMISSIONS
    FOR select
      WHERE $auth.id IN SELECT VALUE id FROM terminal;
Hopefully you are now used to the basics of authorisation and security in SurrealDB and know enough to understand more complex examples and put together your own logic. If you are still hungry for more examples, feel free to check out the DEFINE ACCESS page as well as the examples here in the SurrealDB source code that show a number of DEFINE ACCESS cases that use an extra AUTHENTICATE clause, JWT tokens, bearer tokens, and more.
After all that content on authentication, let's get back to a subject that we haven't touched on since Chapter 5: bidirectional record links. There is quite a bit more to them that would have been too much for an early chapter like that, but which we are well prepared to learn by now!
Using the ON DELETE clause for record links
The nation of San Marino in the south of Europe is particularly interested in putting its written records for its citizens into the database so that it can make its government more efficient. Let's take a look at one of their first contacts with Aeon as they discuss a way to use Aeon's database.
San Marino would like to use simple queries via a single field called possessions that contains nothing but record links to the items that a citizen might own. Here is some example code that they came up with.
[
  {
    possessions: [
      {
        id: book:5j7x1svklymu7ywre515,
        title: 'Li aventuras del micri Pinocchio'
      },
      {
        address: '150 Jardin del Via del Sud',
        id: house:12unp3fdsgmzk5znix7t
      },
      {
        id: weapon:243dt4sey2dr43icgz42,
        type: 'longsword'
      }
    ]
  }
]
But San Marino would also like to be able to query these links bidirectionally. Sounds like a case for the REFERENCE keyword! Let's add that now. But note that instead of putting the REFERENCE keyword on the citizen table, we'll put it on the book and house and sword tables. We'll see why in a moment.
In the meantime, we can use the <~ syntax as we first learned in Chapter 5 to see all of the referring records from this citizen.
{
  citizen_of: government:san_marino,
  id: citizen:of_san_marino,
  possessions: [
    {
      id: book:towp841c1ds40hwnwtog,
      owner: citizen:of_san_marino,
      title: 'Li aventuras del micri Pinocchio'
    },
    {
      address: '150 Jardin del Via del Sud',
      id: house:3vx2zdxaoyqyrhtu4o3t,
      owner: citizen:of_san_marino
    },
    {
      id: sword:9o30rngggv61qy25s3t4,
      length: 5.5f,
      owner: citizen:of_san_marino
    }
  ]
}
Besides using the <~ syntax inside a query, we can also define a field on the citizen table to keep track of any incoming references. Defining a field in this way is like using <~ except that it is now done automatically and becomes part of the fields of the table itself.
Here we could use <~? to pick up all incoming references from everywhere, but let's specify the incoming table types instead to make the code more clear and easy to work with. Here we can create a separate field for each type of item if we want, plus a final field that picks up any and all items.
/**
[test]

[[test.results]]
value = "NONE"

[[test.results]]
value = "NONE"

[[test.results]]
value = "NONE"

[[test.results]]
value = "NONE"

*/


DEFINE FIELD books ON citizen COMPUTED <~book;
DEFINE FIELD swords ON citizen COMPUTED <~sword;
DEFINE FIELD houses ON citizen COMPUTED <~house;
-- Can do this too if you want to specify exactly these three types of items:
-- DEFINE FIELD possessions ON citizen COMPUTED <~(book, sword, house);
DEFINE FIELD possessions ON citizen COMPUTED <~?;
Here the fields are COMPUTED, because for such a link you want to compute the path every time a query takes place.
The database won't stop you from defining a field of VALUE <~? without the COMPUTED keyword, but 99% of the time this is not what you want because a VALUE is only calculated whenever a record is created or updated, not every time it is queried. So if you use a schema like this to create an owner relationship between a book and person table...
DEFINE FIELD owner ON book TYPE record<person>;
DEFINE FIELD books ON person VALUE <~book;

CREATE person:from_san_marino;
CREATE book SET owner = person:from_san_marino;
SELECT * FROM person;
Then this person's books won't even show up because the person record was created before the book existed, and that's when the value for the field books was calculated.
[
  [
    {
      books: [],
      id: person:from_san_marino
    }
  ]
]
Anyhow, here is the schema for the San Marino government with the four new COMPUTED fields.
The schema so far looks like it might be okay...except for one problem. Let's take a look at what happens to references when the record they link to is deleted. Why, nothing happens at all! That is the problem.
For example, if we delete the citizen in the database and do a search on the book, the citizen will still show up as the owner. That's probably not what the government of San Marino wants.
/**
[test]

[[test.results]]
value = "NONE"

[[test.results]]
value = "NONE"

[[test.results]]
value = "NONE"

[[test.results]]
value = "NONE"

[[test.results]]
value = "NONE"

[[test.results]]
value = "NONE"

[[test.results]]
value = "NONE"

[[test.results]]
value = "[{ id: government:san_marino }]"

[[test.results]]
value = "NONE"

[[test.results]]
value = "{ id: book:80fynyd9n3jysg6vbbu7, owner: citizen:gdnkbv8tfwivmgrktea8, title: 'Li aventuras del micri Pinocchio' }"
skip-record-id-key=true

[[test.results]]
value = "{ address: '150 Jardin del Via del Sud', id: house:h20jgggfw9d592r2f3jy, owner: citizen:gdnkbv8tfwivmgrktea8 }"
skip-record-id-key=true

[[test.results]]
value = "{ id: sword:7lx0dhr6subkq57qeuta, length: 5.5f, owner: citizen:gdnkbv8tfwivmgrktea8 }"
skip-record-id-key=true

[[test.results]]
value = "[]"

[[test.results]]
value = "{ books: [], citizen_of: government:san_marino, houses: [house:uwj46djh964wt4w0718w], id: citizen:0isxnpztegk4rxvxazvo, possessions: [house:uwj46djh964wt4w0718w, sword:rd404pr6wbzoxrsl4rjv], swords: [sword:rd404pr6wbzoxrsl4rjv] }"
skip-record-id-key=true

*/

DEFINE FIELD owner ON book TYPE option<record<citizen>> REFERENCE;
DEFINE FIELD owner ON house TYPE option<record<citizen>> REFERENCE;
DEFINE FIELD owner ON sword TYPE option<record<citizen>> REFERENCE;

DEFINE FIELD books ON citizen COMPUTED <~book;
DEFINE FIELD swords ON citizen COMPUTED <~sword;
DEFINE FIELD houses ON citizen COMPUTED <~house;
DEFINE FIELD possessions ON citizen COMPUTED <~?;

CREATE government:san_marino;
LET $citizen = (CREATE ONLY citizen:of_san_marino SET citizen_of = government:san_marino).id;
CREATE ONLY book SET title = "Li aventuras del micri Pinocchio", owner = $citizen;
CREATE ONLY house SET address = "150 Jardin del Via del Sud", owner = $citizen;
CREATE ONLY sword SET length = 5.5, owner = $citizen;

DELETE citizen;

SELECT * FROM book, house, sword;[
{
id: book:wuz1t0nnwgandqv4wjly,
owner: citizen:of_san_marino,
title: 'Li aventuras del micri Pinocchio'
},
{
address: '150 Jardin del Via del Sud',
id: house:vqkdchltq2pjzaoqzqrr,
owner: citizen:of_san_marino
},
{
id: sword:8lcal17hpr9g8xodsigi,
length: 5.5f,
owner: citizen:of_san_marino
}
]To get some insight into why this is happening, let's take a look at the statement we used to set up the references in the first place.
-- This is the statement we used:
-- DEFINE FIELD owner ON book TYPE option<record<citizen>> REFERENCE;
INFO FOR TABLE book;
Interestingly, the clause ON DELETE IGNORE has been added to our statement!
{
  events: {},
  fields: {
    owner: 'DEFINE FIELD owner ON book TYPE record<citizen> REFERENCE ON DELETE IGNORE PERMISSIONS FULL'
  },
  indexes: {},
  lives: {},
  tables: {}
}
This is the default behaviour when working with references, to do nothing. After all, SurrealDB doesn't want to second guess at what we might want to do. You can imagine that there must be other options besides ON DELETE IGNORE, and this is correct.
Before we look at the options available to us, let's think about what the government of San Marino might want to do with these references. Here is what they told Aeon that they would like to see for each of these types of records:
house: "We don't allow parents to give houses or land to their children. Instead, if the owners of a house die, the house will go on the market. So it should be unlinked to the person but not deleted."book: "We track who owns which books while they are alive, but they are not that important now that books are easier to print. Honestly, we might even stop tracking them one day. In the meantime, if a citizen dies, please just delete the book from the database."sword: "By law, all weapons belong to the government. Citizens 'borrow' them while they are alive, but if they die then they return to the government."
Fortunately, all of these cases are easily possible with an ON DELETE clause. Let's take a look at what the options are:
CASCADE: deletes the referencing record when the referenced record is deleted.UNSET: removes a referenced record from the referencer when it is deleted.THEN: allows for custom logic when a reference is deleted. After typingTHEN, you can open up a new scope inside which$thisrefers to the current record and$referenceto the referencing record.REJECT: disallows a referenced record to be deleted.
It looks like three of these will work with what San Marino wants. UNSET should work for houses, CASCADE for books, and THEN for swords. Let's give them a try!
DEFINE FIELD owner ON book TYPE option<record<citizen>> REFERENCE ON DELETE CASCADE;
DEFINE FIELD owners ON house TYPE option<array<record<citizen>>> REFERENCE ON DELETE UNSET;
DEFINE FIELD owner ON sword TYPE option<record<citizen|government>> REFERENCE ON DELETE THEN {
    UPDATE $this SET owner = government:san_marino;
};

DEFINE FIELD books ON citizen COMPUTED <~book;
DEFINE FIELD swords ON citizen COMPUTED <~sword;
DEFINE FIELD houses ON citizen COMPUTED <~house;
DEFINE FIELD possessions ON citizen COMPUTED <~?;

CREATE government:san_marino;
LET $citizen = (CREATE ONLY citizen:of_san_marino SET citizen_of = government:san_marino).id;
CREATE ONLY book SET title = "Li aventuras del micri Pinocchio", owner = $citizen;
CREATE ONLY house SET address = "150 Jardin del Via del Sud", owner = $citizen;
CREATE ONLY sword SET length = 5.5, owner = $citizen;

DELETE citizen;

SELECT * FROM book, house, sword;
The first change will be to the book table, which will now have an ON DELETE CASCADE clause. If a citizen is deleted, then the books go too. The government simply doesn't care enough to track books that might never have an owner again.
DEFINE FIELD owner ON book TYPE option<record<citizen>> REFERENCE ON DELETE CASCADE;Next is the house table, which will use ON DELETE UNSET to unset the owner field if the owner is deleted. We'll make sure to change this field to an array of citizen records, just to make sure that married people can have joint ownership of their house.
DEFINE FIELD owners ON house TYPE option<array<record<citizen>>> REFERENCE ON DELETE UNSET;Finally, we have the `sword` records. These are temporarily owned by citizens, and by governments if the citizen passes away. We'll change the possible record types now to `record`, and inside the scope opened after `ON DELETE THEN`, we can simply update the `owner` field to be the government of San Marino. Easy!
/**
[test]

[[test.results]]
value = "NONE"

*/

DEFINE FIELD owner ON sword TYPE option<record<citizen|government>> REFERENCE ON DELETE THEN {
    UPDATE $this SET owner = government:san_marino;
};
Putting it all together, we get the following queries. This time we'll also add a second citizen who is married to the first. After the first citizen passes away, the second citizen will live in the house and thus the house will still show a single record in its owners field.
-------- Query --------

[
  {
    id: sword:xz5cowhsu6zy0qcpd2pn,
    length: 5.5f,
    owner: citizen:warl3sxzo1wzfc07azn1
  },
  {
    id: book:y1jmmch46zl5t4nuid4s,
    owner: citizen:warl3sxzo1wzfc07azn1,
    title: 'Li aventuras del micri Pinocchio'
  },
  {
    address: '150 Jardin del Via del Sud',
    id: house:yp4kwji82al8obg8pkut,
    owners: [
      citizen:warl3sxzo1wzfc07azn1,
      citizen:gpdf617c3a7nsamkne5c
    ]
  }
]

-------- Query --------

[
  {
    id: sword:xz5cowhsu6zy0qcpd2pn,
    length: 5.5f,
    owner: government:san_marino
  },
  {
    address: '150 Jardin del Via del Sud',
    id: house:yp4kwji82al8obg8pkut,
    owners: [
      citizen:gpdf617c3a7nsamkne5c
    ]
  }
]

-------- Query --------

[
  {
    address: '150 Jardin del Via del Sud',
    id: house:yp4kwji82al8obg8pkut,
    owners: []
  }
]
We are getting closer to the end of the book, and so in the next two chapters we will deal with more advanced queries to make sure that you are as fluent in SurrealDB as possible. See you in the next one!
Practice time
1. You connect to a fresh surreal start instance using surreal sql or Surrealist without signing in. Why does even RETURN 1 fail?
Answer
SurrealDB denies anonymous access by default, so you'll get a permissions error until you authenticate as a system or record user. To allow this, define a user with DEFINE USER (system) or DEFINE ACCESS (record), or restart the database with --unauthenticated if you want to allow any and all users accessing the database to have the same permissions as a root user.
2. A citizen record owns a house through a record link field. The citizen is deleted. How do you remove the house automatically in this case?
Answer
You can define the link field with ON DELETE CASCADE. When the parent record goes away, SurrealDB will automatically delete linked records.
DEFINE FIELD owners ON house TYPE array<record<citizen>>
  ON DELETE CASCADE;